eCSV Import
The CSV module Import allows importing items, item sets, means and users in your Omeka S installation from a CSV file (values separated by commas), TSV (values separated by tabs) or ODS (OpenDocument Spreadsheet). This module is only available to users with a Administrador Global or Supervisor rol.
In order to use CSV Import it is necessary that the installation of Omeja S has a PHP working correctly, as the importation processes run in the background. Before starting an importation, it has to be verified that the PHP is detected in the System Information page.
Preparing a CSV file
Most of the spreadsheets editors, such as Microsoft Excel, LibreOffice Calc, allow exportation to CSV, TSV or ODS format.
Important points:
- CSV files must be codified in UTF-8 in order to avoid problems with special symbols.
- Generally speaking, just one type of data per file must be imported: a list of items, an items set list, a means list, etc. However, there is an option of mixed importation if a column which identifies each type of row is included.
- The file must include a row of headers so that the module can process the data correctly.
- If one property has multiple values (for example, various authors), they can be separated by a secondary separator of values. By defect, the semicolon is used (;), but others can be choose.
Names for the columns
Cada columna del CSV debe corresponderse con una propiedad del vocabulario de Omeka S. El módulo puede mapear automáticamente las columnas cuyos encabezados sigan el formato prefijo:propiedad.
Each column from CSV should correspond to one property of the vocabulary coming from Omeka S. The module can automatically maps the columns whose headers follow the format prefix:propierties.
For example:
- dcterms:title will automatically be assigned to the propierty "Title" in Dublin Core.
- foaf:firstName will be assigned to a "firstName" from Friend to a Friend.
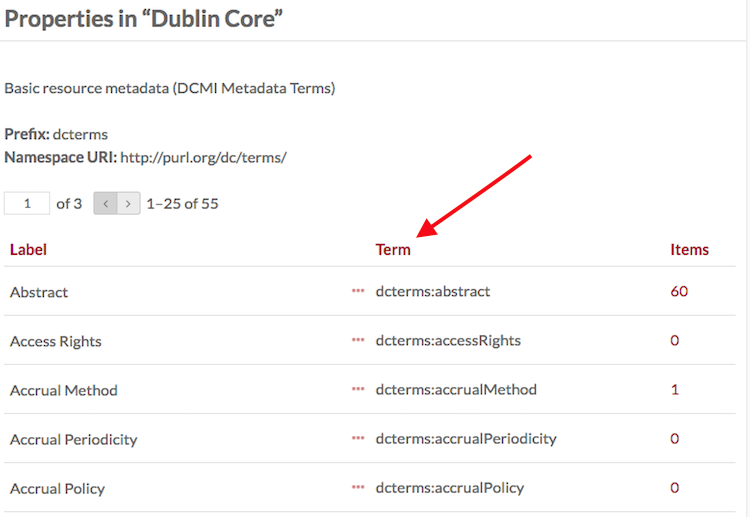
In order to find the correct terms, access to the Vocabularies tab in the administration panel and check the properties list.
If the headers do not exactly match the vocabulary terms, mapping should be done manually during importation.
Setting up the importation
To start an importation, go to the CSV Import tab located in administration sidebar. This will open the importation's opening setting page.
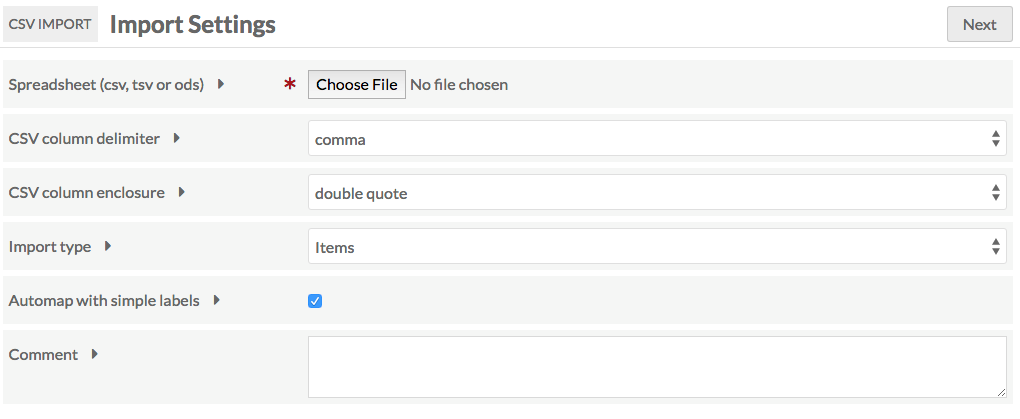
- Select a CSV file from your computer.
- Set up the column delimiters, choosing the character which separates the values:
- Comma (by defect)
- Semicolon (;)
- Colon (:)
- Tabulation. In addition, a closure symbol for long texts, such as quotation marks, can be set.
- Select what type of importation:
- Items
- Item sets
- Media (a column matching Media to already existing Items is required)
- Mixed resources (debe incluir una columna que identifique el tipo de cada fila)
- Users
- Automatic mapping should be activated if you want the vocabulary properties to be assigned column names by the system.
- Add comments (optional) in order to identify the importation in the previous importations register.
- Click Next to continue the importation process.
Import items
Se abrirá una página con varias pestañas: To import items, select "items" as importation type in the first page and click Next.
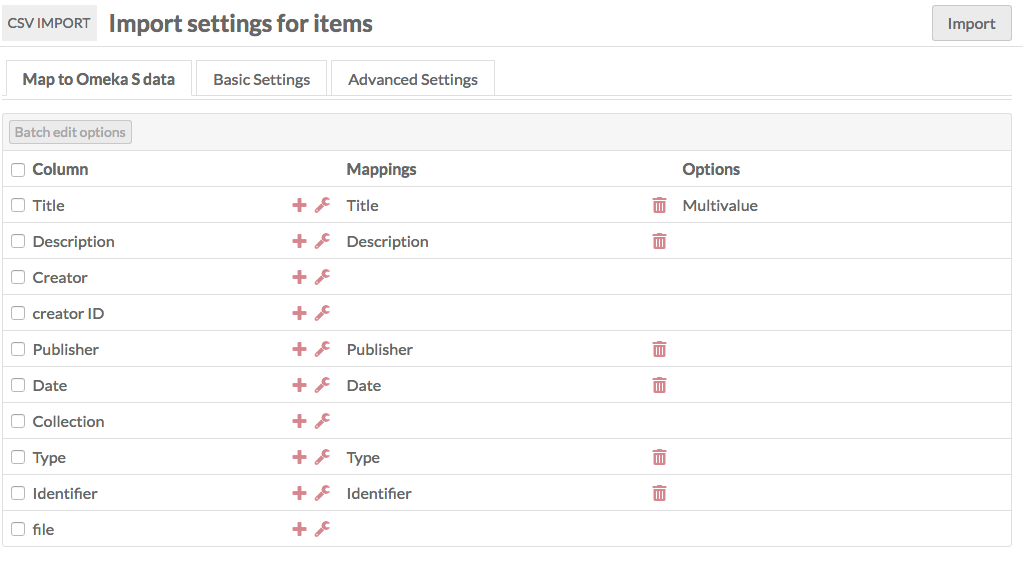
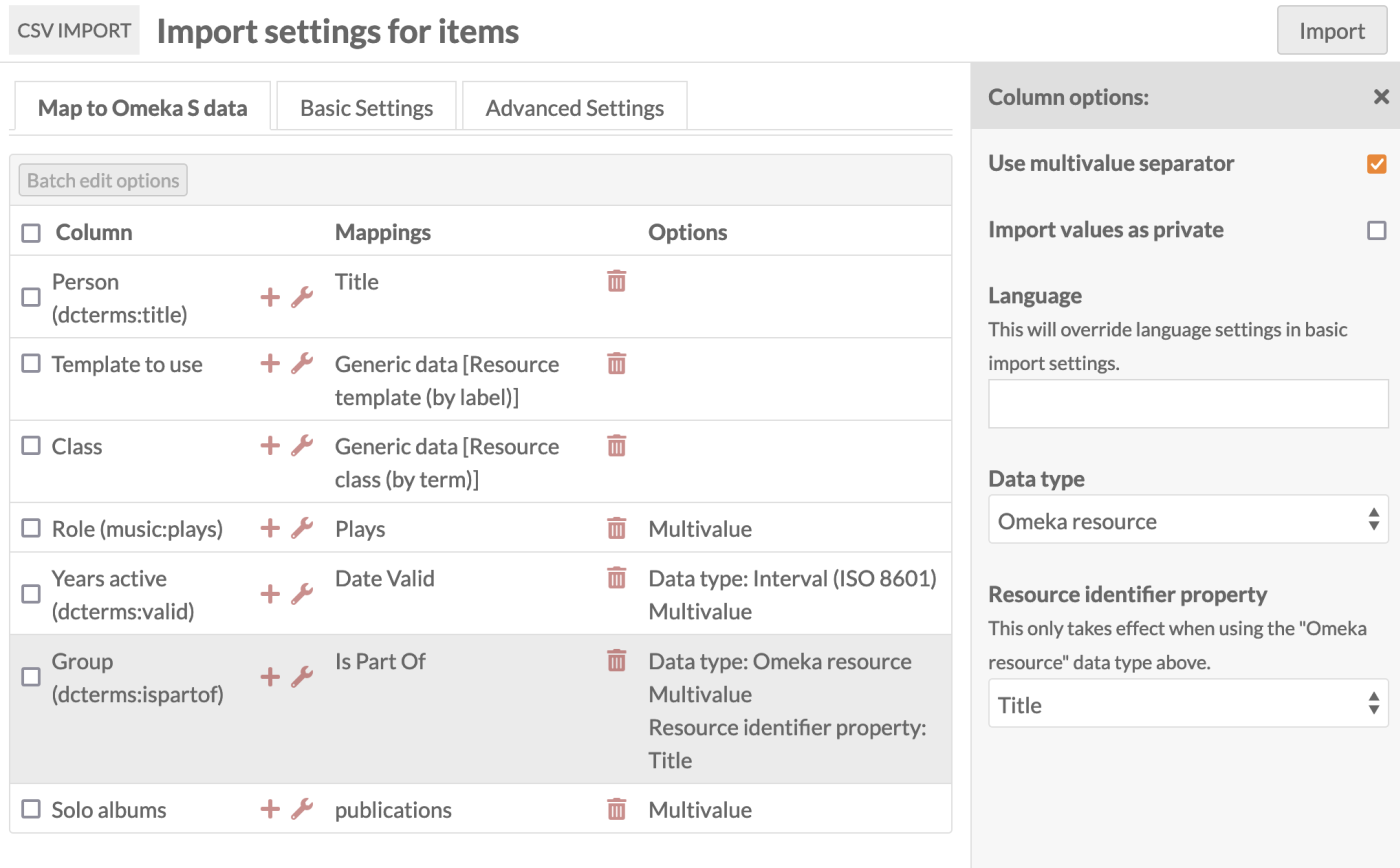
Mapping Omeka S data
Then, a table with the columns from your CSV files will appear, each one representing a row. For each row, the following options will be available:
- A checkbox for including or excluding a column.
- Column name as its appear in CSV
- A "+" button to add or modify the mapping.
- A wrench button for column additional options.
- A column displaying properties mapped, either automatically or manually.
- A trash can icon for eliminating existing mappings.
- Particular options for each column, such as visibility or the use of multivalue separators.
The system can automatically map some of the column to Dublin Core properties if it detects matches.
Mapping options
A panel containing mapping options will open if clicking the plus symbol buttom.
- Properties: Assign a installed vocabulary property (such as Dublin Core, Bibliographic Ontology, FOAF, among others). The filter field can be used for researching a specific property.
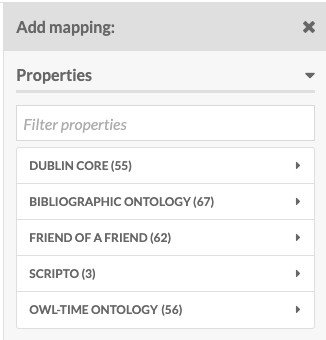
- Item-specific data: If you wish to assign elements to a specific set (Item set), it can be defined using its ID or any other property.
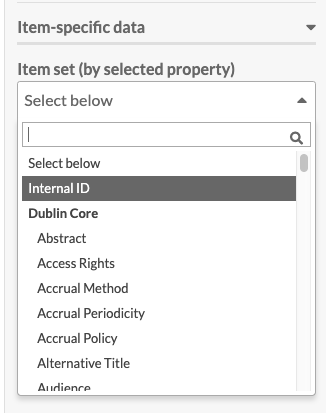
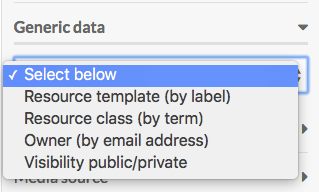
- Generic Data:
- Resource template: Apply the template for imported items. .
- Resource class: Define the resource class, making sure it excatly matches the vocabulary's nomenclature.
- Owner: Establishes a user as item owner by email address.
- Visibility: Defines if a element will be "public" or "private".
Media source
If importing media together with elements, a source can be chosen from the dropdown:
- HTML
- IIIF (image or presentation)
- oEmbed
- URL
- YouTube
Remember to click on "Apply Changes" to save changes.
Column options
Each CSV column has additional setting available as seen if clicking on the wrench icon:
- Multivalue separators: Define a separator to separate data within the same cell.
- Language: Set the language for the content using the IETF tag.
- Import values as private: Check this box to set all property values private.
- Data type:
- Text (default).
- URI reference, with optional tag (example: http://example.com Tag).
- Omeka S resource, which allows linking other platform elements.
If a resource already exists in CSV and it has to be linked to other previously created in the same importation, it is advised reducing the number of processed rows by batch in the "Advanced Settings" tab.
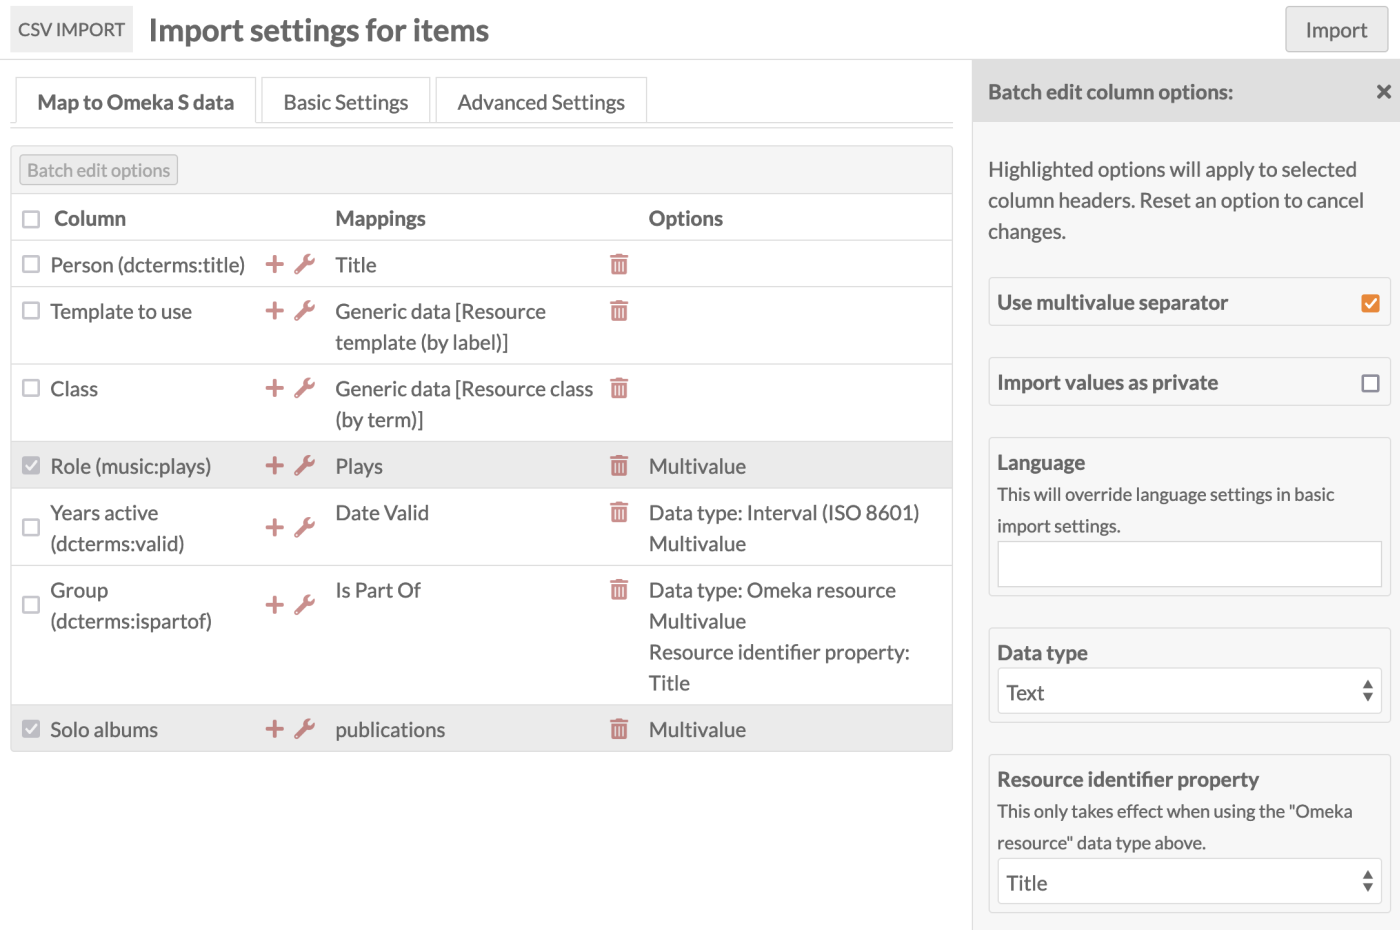
Batch edition
Settings can be applied simultaneously to different columns by selecting them and using "Batch edit options". This allows establishing language, data type and privacy for multiple columns at once.
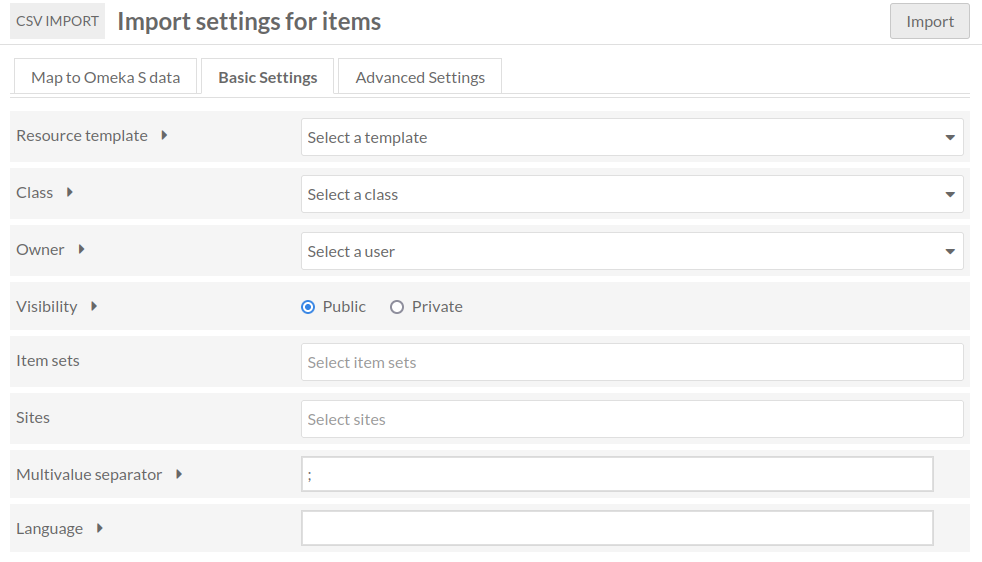
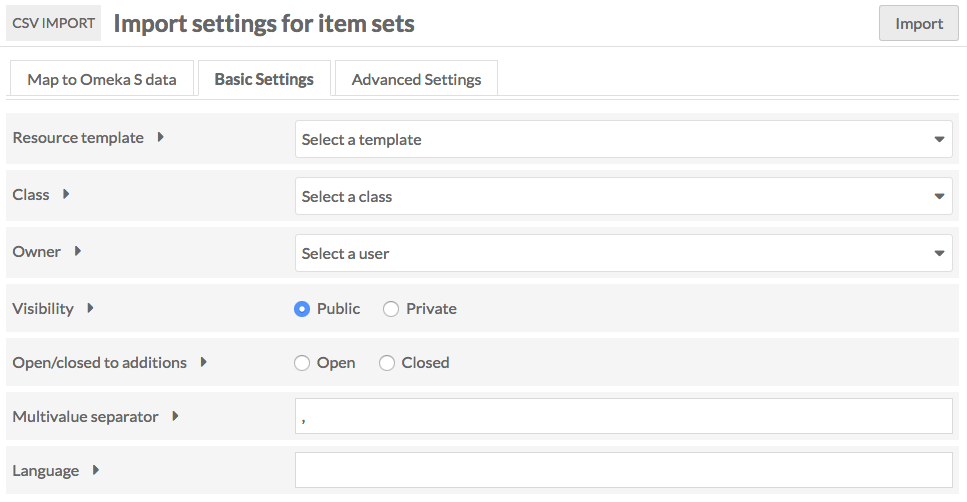
Item import basic settings
In the "Basis Settings" tab the following can be defined:
- Resource templat.
- Resource class.
- Owner.
- Visibility (publir or private).
- Item sets.
- Sites where elements will be added to.
- Multivalue separator
- General language for the values.
Si alguna columna del CSV ya define estos valores, sobrescribirá la configuración general. If any CSV column already defines these values, the general setting will be overwritten.
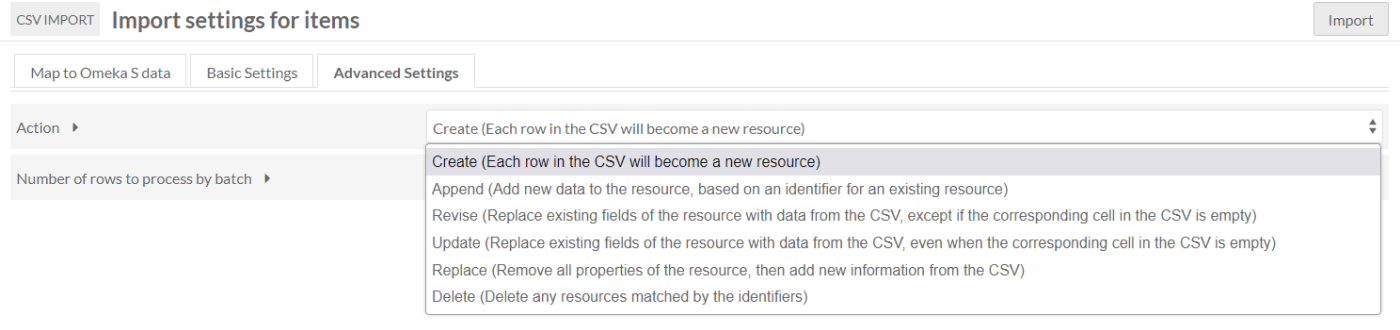
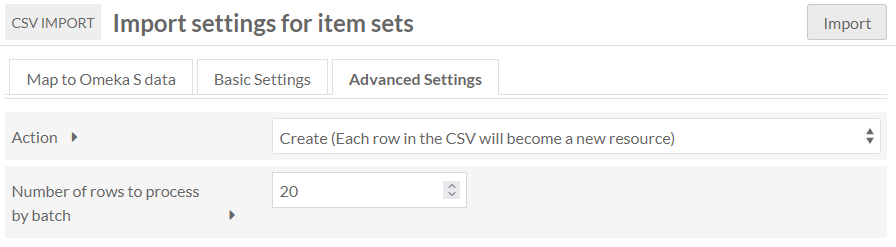
Advanced settings
"Advanced Settings" tab, the type of action in process can be changed:On the
- ). (default optionCreate a new resource
- Update already existing resources.
- Delete resources.
ze performance. How many rows by batch will be processed can also be defined in order to optimi
Complete import
This should start the import and redirect you to the "Past Imports" tab. Once the whole mapping, column options and settings have been set up, click on "Import".
Import Item Sets
To import item sets, select "Item Set" under the "Import type" on the first page. When you click "Next", the page will load with the following tabs:
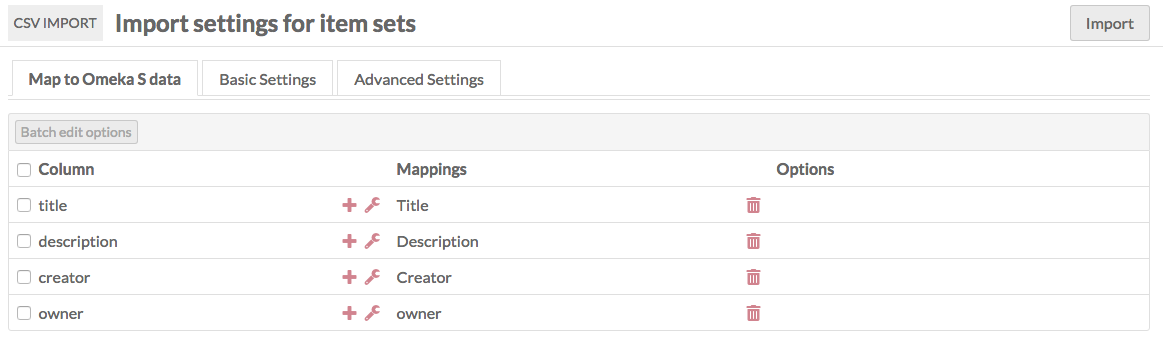
Map to Omeka S data
This tab displays a table with the columns from your spreadsheet as rows. Each row displays the following:
- A checkbox.
- The column header from the spreadsheet.
- A "+" button for adding or modifying a mapping.
- A wrench symbol button for spreadsheet column options.
- A column displaying properties mapped, either automatically or manually.
- A trash can icon to delete existing mappings.
- A column to show the particular options selected for each row.
Mapping options
To assign a coulmn header to a vocabulary property, click on the "+" button next to the column header. A drawer on the right will open with multiple mapping options:
- Properties: Select a property from the installed vocabulary to which assign column data. The filter field can be used in order to search for specific properties.
- Item set-specific data: Allow other users to edit or add to the item set by marking the "Open to additions" option. Otherwise, it can only be modified by the set creator and the admins.
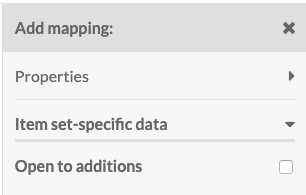
- Generic data: A value for template, class or resource owners can be assinged. In order to do so, make sure the CSV values correspond exactly to the Omeka S values.
- Visinility public/private: Set the visibility of the item set as "public" or "privte".
Remember to click on "Apply changes" to save modifications.
Column options
In addition to mapping, options for your CSV columns can be established. If adding options withour mapping data, they will not be imported.
Click on the wrench icon next to the column header in order to open the options drawer. Type:
- Use multivalve separator: Allows dividing the values in each cell using a defined separator.
- Language: Define the language of the text.
- Import values as private: Check this option if you want the values of that column to be private.
- Data type: Choose between importing as text, URL or Omeka S resource.
Batch Edit
If selecting more than row in the table, use the "Batch edit" option to apply the same setting to multiple columns at once. Make sure to click on "Apply changes" to save the settings.

Item Set import basic settings
These settings can be applied to every CSV file. However, they can be annulled by the columns options. The options include:
- Resource template: Select a resource template to apply to the imported item sets
- Class: Define a class for the item sets
- Owner: Set the owner by selecting a user.
- Visibility: Set the visibility of the imported item sets as public or private.
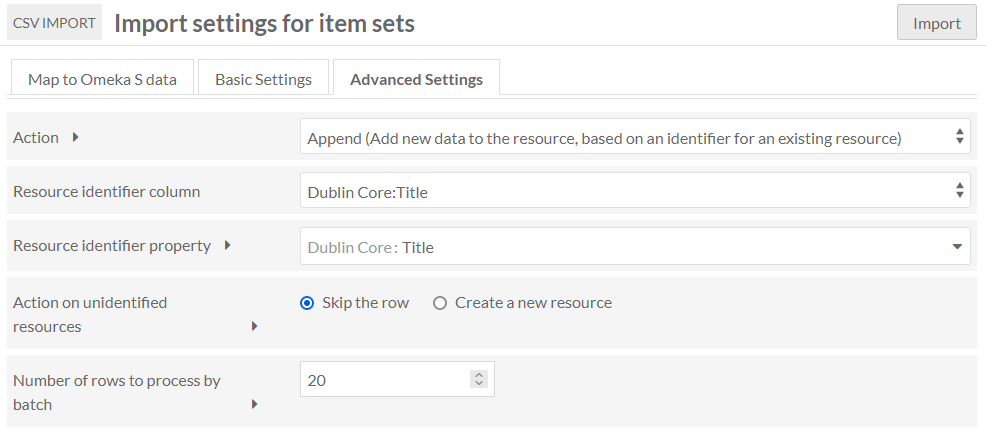
Item Set import advanced settings
In the "Advanced settings" tab, the number of rows to process by batch can be defined. This can be useful if mistakes during the import are founded and you want to try with a smaller number of rows.
Action
The following options can be chosen in order to define how to process the import:
- Create a new resource: Each row in the CSV will become a new resource.
- Append data to the resource: Add new data to an existing resource.
- Revise data of the resource: Replace existing data of the resource with data from the CSV.
- Update data of the resource: Replace existing data of the resource with data from the CSV, even when the corresponding cell in the CSV is empty.
- Replace all data of the resource: Remove all properties of the resource, and fill with new information from the sheet.
- Delete the resource: Delete all matching resources.
Complete import
This should start the import and redirect you to the "Past Imports" tab. Once the whole mapping, column options and settings have been set up, click on "Import".
Import media
To import media, select "Media" under the "Import type" on the first page.
In order to import media, you must have a column in the CSV that maps to item data. Media cannot exist unless associated with an item by a unique identifier (Omeka item ID, title, etc.). Note that if you are running an advanced job, such as an update or replace, then you do not have to have a column with associated item data, only a way to match the rows to media that already exist.
When you click "Next", the page will load with the following tabs:
Map to Omeka S data
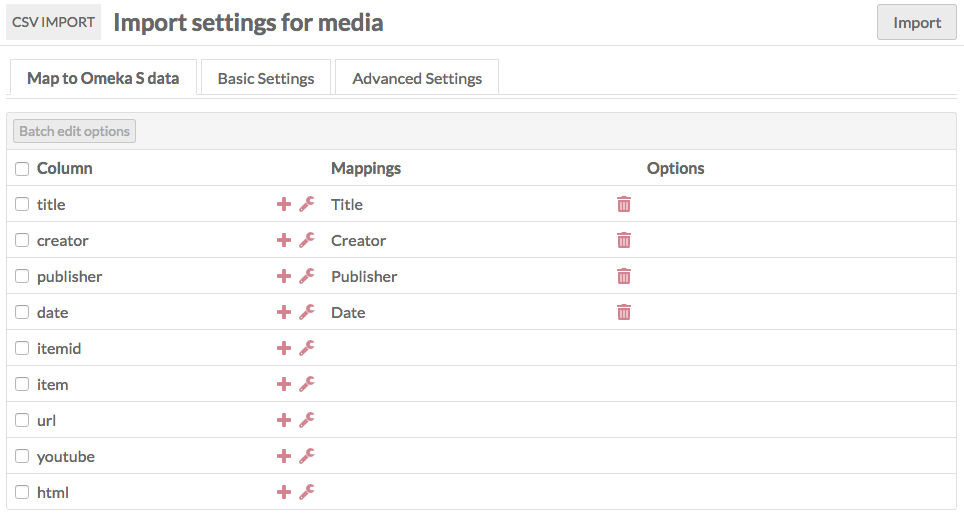
This tab displays a table with the columns from your spreadsheet as rows. Each row displays:
- A checkbox
- The column header from the spreadsheet
- A "+" button for adding or modifying a mapping
- A wrench symbol button for spreadsheet column options
- A column displaying properties mapped, either automatically or manually
- A trash can to delete existing mappings
- A column to show the particular options selected
Mapping options
To map a column header to a vocabulary property, click on the "+" button on the column header. This will open a drawer on the right-hand side of the screen with multiple mapping options:
- Properties: Select a property to map the column data to, from any of the installed vocabularies. Use the Filter field to search the available properties for a specific property.
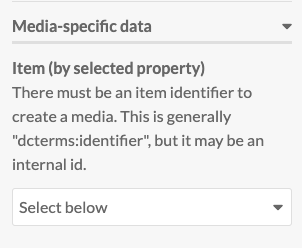
- Media-specific data: There's a dropdown to set the item to which the media should be added. You can either use the item's internal ID, or match with any one of its unique properties (title, description). The item's ID can be found at the end of the URL in the item edit page.
- : Hay un desplegable donde puedes elegir entre cuatro opciones:Datos genéricos
- Resource template (by label): Assignthe template by a name.
- Resource class (by term): Assign the resource class for an item. The term for the class in the spreadsheet and in the Omeka S installation must match exactly.
- Owner (by email address): Assign an item's owner by email address associated with an Omeka S account.
- Visibility (public/private): Define media visibility (public or private).
- : Para la columna en tu hoja de cálculo que apunta al medio que estás creando, selecciona el tipo de medio desde el menú desplegable:Fuente de medios
- HTML
- IIIF image (link)
- IIIF presentation (link)
- oEmbed (link)
- URL
- YouTube (link)
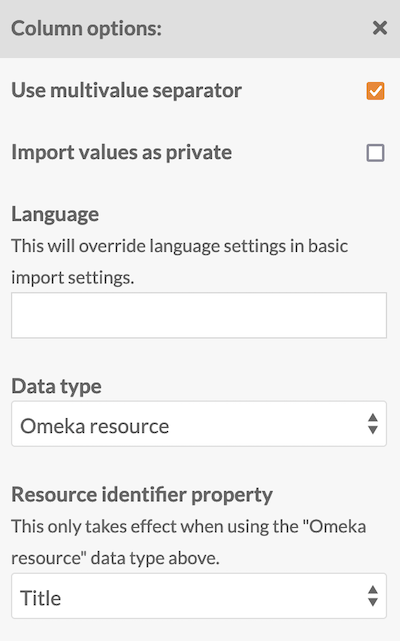
Column options
Click on the wrench icon next to a column header to access to additional options. Some of the options include:
- : Marca esta casilla si deseas usar un separador de valores múltiples para los datos de esa columna.Separador multivalor
- : Define el idioma de los datos en esta columna mediante una etiqueta de idioma IETF.Idioma
- : Marca esta casilla para establecer todos los valores de propiedad en esta columna como privados.Importar valores como privados
- : Elige entre opciones como "Importar como texto", "Importar como referencia URL" o "Importar como recurso de Omeka S".Tipo de datos
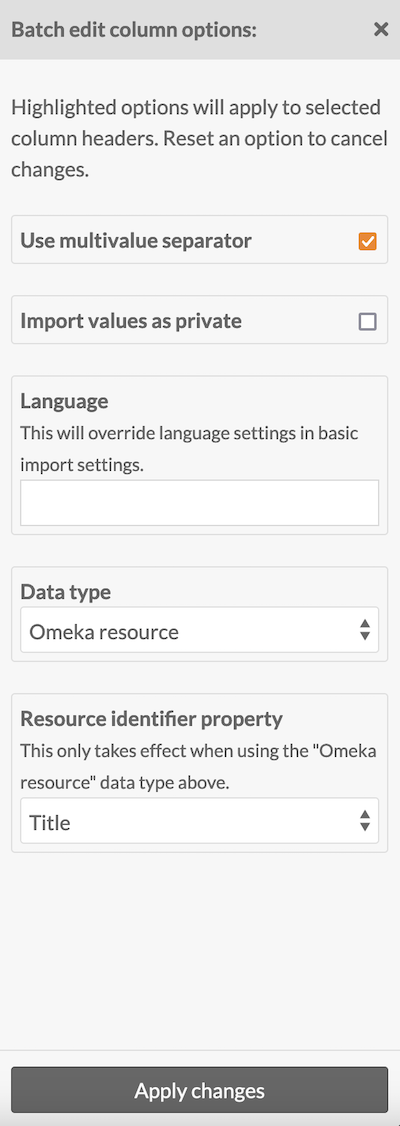
Batch edition
para aplicar las opciones de columna a varias columnas de una vez."Opciones de edición por lotes"Si seleccionas varias filas en la tabla (columnas de tu archivo CSV), puedes usar el botón
Item import basic settings
These settings apply to the entire CSV you are importing. Note these settings can be overwritten by column options in the Map to Omeka S data tab.
- : Selecciona una plantilla de recurso para los medios importados.Plantilla de recurso
- : Selecciona una clase de recurso para los medios.Clase
- : Asigna un propietario al medio.Propietario
- : Define la visibilidad (público/privado).Visibilidad
- : Introduce el carácter separador si has usado uno para valores múltiples.Separador multivalor
- : Define el idioma de los valores de la hoja de cálculo.Idioma
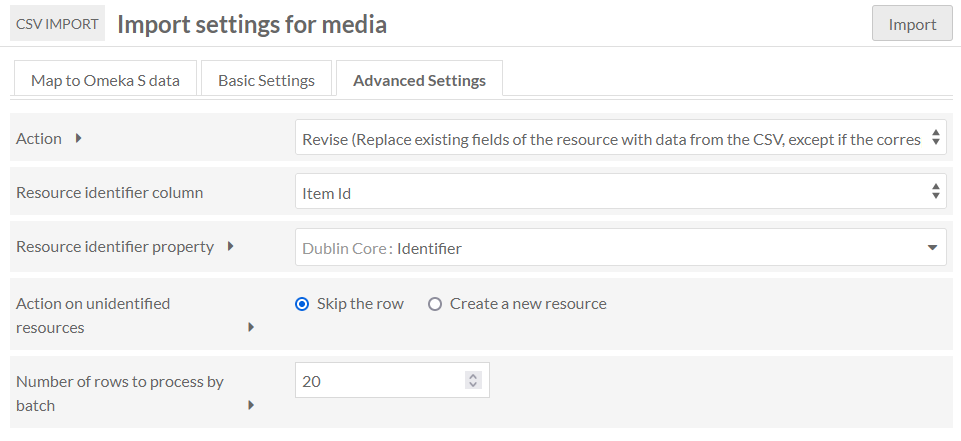
Item import advanced settings
These options are your advanced users:
- : Elige la acción a realizar con los datos importados, como crear un nuevo recurso, agregar datos a un recurso existente, actualizar datos, o eliminar recursos.Acción
- : Elige una columna de tu archivo CSV que contenga un identificador único para los recursos existentes.Columna de identificador de recurso
- : Selecciona la propiedad en la instalación de Omeka S que contiene los identificadores.Propiedad del identificador de recurso
Complete import
. Deberías ver un mensaje de confirmación indicando que la importación está en proceso.Importaciones pasadas en la esquina superior derecha. Esto iniciará la importación y te redirigirá a la pestaña de ImportarUna vez hayas configurado los mapeos, opciones de columna y ajustes, haz clic en el botón de
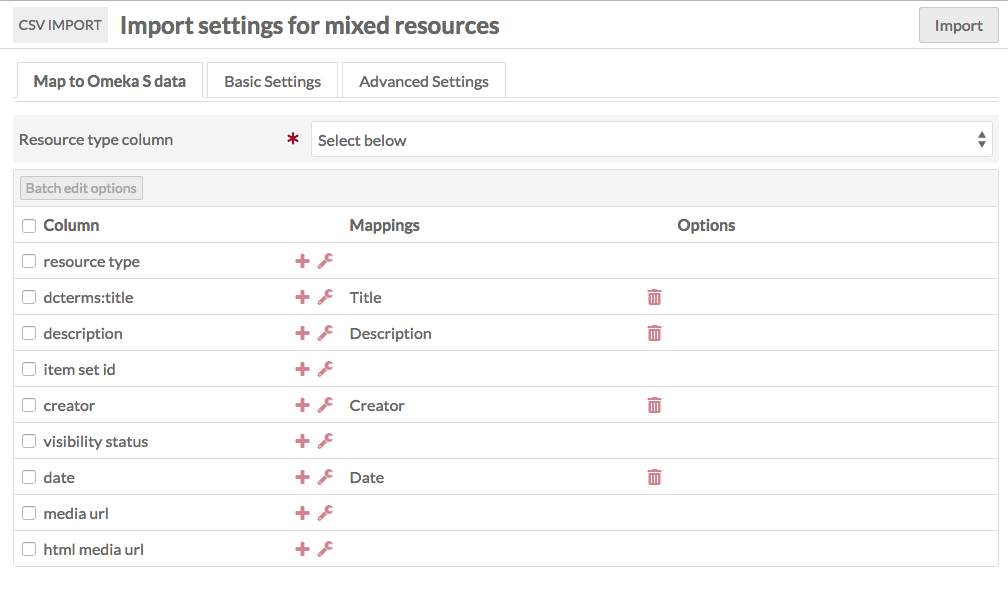
Mixed resources import
This resource option allows you to import a sheet with a mix of resource types: items, item sets, and media.
Map to Omeka S data
This tab displays an initial dropdown above a table with the columns from your spreadsheet as rows. Each row displays:
- A checkbox
- The column header from the spreadsheet
- A plus symbol button for adding or modifying a mapping.
- A wrench symbol button for spreadsheet column options in the spreadsheet.
- A column displaying properties mapped, either automatically or manually.
- A trash can to delete existing mappings.
- A column to show the particular options selected.
The dropdown above the table is where you set which column in the CSV file indicates whether the data in that row is an item, item set, or media. You do not need to map this data in the table on this tab. Values in this column can be "item" or "items", "item set" or "itemset" or "itemsets", or "media". Other values, or empty fields, will lead to the row not being imported.
Rows with media in the resource type column need to indicate which item they are to be attached to, as in the Media section above, and require a media source to be included.
Mapping options
To map a column header to a vocabulary property, click on the plus symbol button to the left of the column header. This will open a drawer on the right-hand side of the screen.
The drawer has multiple options for mapping:
- disponibles: Dublin Core, Bibliographic Ontology, Friend of a Friend, Scripto y OWL-Time Ontology.Vocabularios: selecciona una propiedad a la que mapear los datos de la columna, de cualquiera de los vocabularios instalados. Usa el campo de filtro para buscar la propiedad deseada. Propiedades
- : tiene un desplegable para establecer el conjunto de ítems por propiedad seleccionada. Si tienes una columna con datos de un conjunto de ítems al que deseas agregar un elemento, puedes configurar cómo se mapea usando este desplegable. Puedes usar el ID interno del conjunto de ítems o cualquiera de sus propiedades (título, descripción).Datos específicos de ítems
- : tiene una casilla de verificación para "Abierto a adiciones". Marca esta opción para permitir que otros usuarios editen o agreguen al conjunto de fichas. Déjalo desmarcado para que solo el creador del conjunto, administradores del sitio y administradores globales puedan editarlo.Datos específicos de conjuntos de fichas
- : tiene un desplegable para establecer el ítem al que debe asociarse el medio. Puedes usar el ID interno del ítem o cualquiera de sus propiedades (título, descripción). El ID de un ítem es la secuencia numérica al final de la URL cuando estás en la página de vista o edición del mismo.Datos específicos de medios
- : tiene un desplegable donde puedes establecer una de las siguientes opciones:Datos genéricos
- Resource template (by label): Set the template for the media by name.
- Resource class (by term): Set the resource class for the media.
- Owner (by email address): Set the media's owner by email address.
- Visibility public/private: Set the visibility of the media as "private" or "public".
- : para las columnas de tu hoja de cálculo que apuntan a los medios, selecciona de un desplegable para cada columna el tipo de fuente de medios:Fuente de medios
- HTML
- IIIF image (link)
- IIIF presentation (link)
- oEmbed (link)
- URL
- YouTube (link)
Be sure to click the "Apply changes" at the bottom of the drawer in order to keep the settings.
To remove a mapping, click the trash can icon in the row. It will remove only the mapping, not the column data.
If you have data in a column in your CSV that you do not want to import to Omeka S installation, simply do not map that column to a property or data type.
Column options
Column options are in addition to mappings. If you add options without also mapping column data to resource, media, or other data, nothing will be imported.
To access options for data in a column of your CSV, click the wrench icon next to the column header.
This will open a drawer on the right side of the browser window with the following options:
- : Marca esta casilla para usar el separador multivalor para los datos en esta columna.Usar separador multivalor
- : Establece el idioma para esta columna usando la etiqueta de idioma IETF.Idioma
- : Marca esta casilla para establecer todos los valores de propiedad en esta columna como privados.Importar valores como privados
- : Un desplegable con varias opciones, que corresponden a los valores al agregar propiedades a un elemento:Tipo de datos
- Import as text (default).
- Import as URL reference.
- Import as Omeka S resource.
Batch edition
When you select one or more rows in the table (columns from your CSV file), you can use the "Batch edit options" button to apply the column options described above to multiple CSV columns at once.
Be sure to click the "Apply changes" button at the bottom of the drawer in order to save your changes.
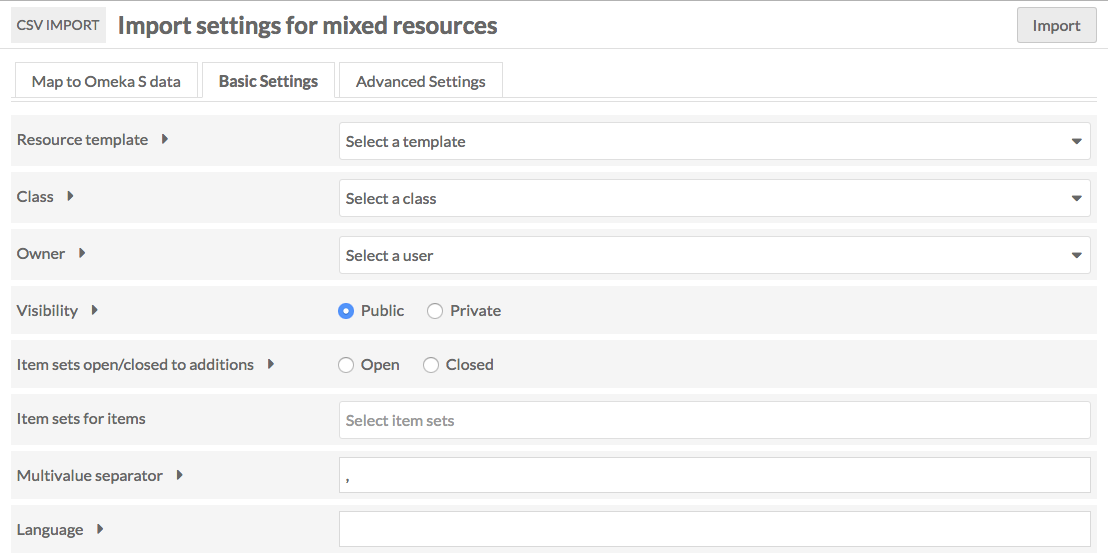
Mixed resources import basic settings
These settings apply to the entire CSV you are importing. Note these settings can be overwritten by column options in the Map to Omeka S data tab. If a column is mapped for template, class, or owner, those values will override these settings.
Options available include:
- Resource template
- Class
- Owner
- Visibility
- Item sets open/closed to additions
- Item set for items
- Sites for items
- Multivalue separator
- Language
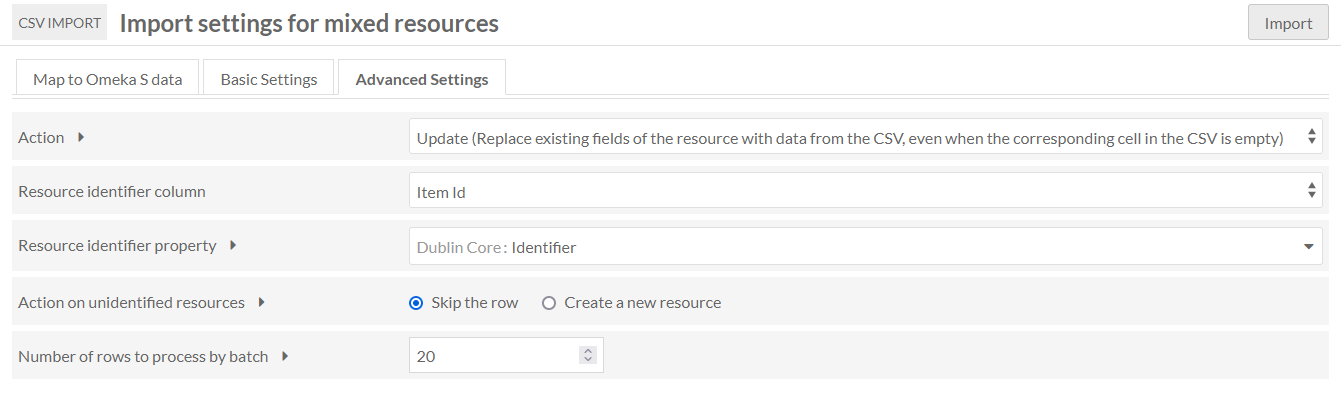
Mixed resources import advanced settings
The Action setting allows you to change the import process to one of the following options:
- Create a new resource
- Append data to the resource
- Revise data of the resource
- Update data of the resource
- Replace all data of the resource
- Delete the resource
The resource identifier and the resource identification property can be set, which will determine what resources will update during the process.
Complete import
Once you have completed mappings, column options, and any settings, click the "Import" button in the upper right corner of the browser window. This should start the import and redirect you to the "Past Imports" tab. You should see a confirmation message saying "Importing in Job ID [number]".
Resource import in Omeka S, using CSV files, is a powerfull tool to load large data volumes efficiently. Attending on how to properly prepare and map a CSV file, a variety of resources can be imported, including items, tokens and items set, individually or in a mixed manner, thus optimazing the creation and the platform content management process.
- Correct preparation of the CSV file, making sure the columns are well defined and data is consistent.
- Import items, tokens and media sets requiere special atention to details: from the identifiers to the relations between them, as well as the links between media and items. Users have the possibility of advanced settings, such as visibility, resource template and assigning specific site or class, which allows the further customization of the process.
- Mixed import offers flexibility to upload different types of resources in one CSV file, which simplifies and speed ups the process. Users can decide which actions to take about existing resources, such as creating new ones, add data or updating the existing ones, which gives total control over the importation process.
Omeka S resources import is a key funcionality which, if it is used correctly, allows operating large data cuantities in a effient and organized manner. Through carefull mapping and customized options setting, user can make sure that resources are accurately imported and suited for their needs, optimazing workflow and content administration in the platform.